Overview
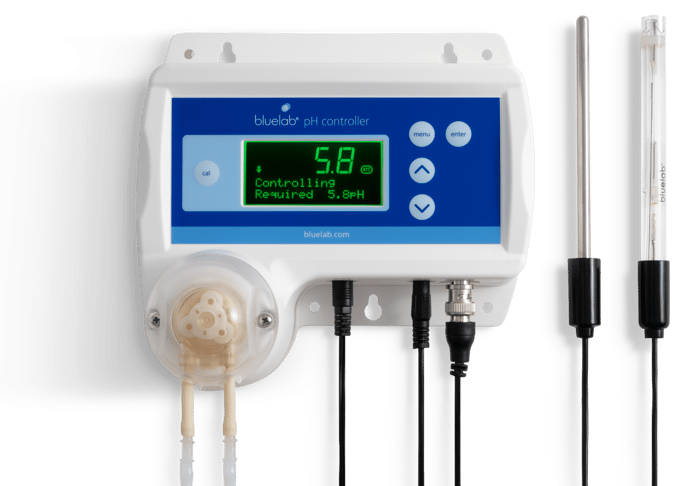
The Bluelab pH Controller maintains consistent pH levels in your reservoir with automated dosing.
This Getting Started Guide covers the Bluelab pH Controller, pH Controller Connect and pH Controller Connect M.
Product manuals:CONTPH User Manual - English
CONTPHCON User Manual - English
1. Set up Connect Software
- Note the 4 character KEY CODE on the back of the Bluelab pH Controller Connect.
- Follow instructions in the Bluelab Connect Stick Getting Started guide to install the Connect Stick and Connect Software. Add the pH Controller Connect to the pH Controller.
Installing the Bluelab pH Controller
- Select a suitable location that is:
- At a suitable height to see the display and for easy operation
- Less than 5.65ft / 2m from your reservoir. (The probes must be immersed in solution at all times.)
- Less than 4.9ft / 1.5m from an electrical mains outlet.
- Less than 5.56ft / 2m from pH up/down solution. The inlet tube must reach the bottom of the container.
- Fix the fasteners through the desired mounting holes in the top and bottom of the case. NOTE: Avoid placing the pH controller where it can be damaged by direct sunlight, water, nutrient salts or pH adjuster.
Connecting the Bluelab pH and Temperature Probes
1. Connect the pH probe to the pH controller. Push the BNC connector to the controller and twist to attach.
2. Fasten securely by pushing the pH probe connector on and twisting one quarter turn.
3. Insert the temperature probe connector to the base of the pH controller where ‘ATC’ is labelled. Ensure the connector is fully inserted.
Set up inlet dosing tube 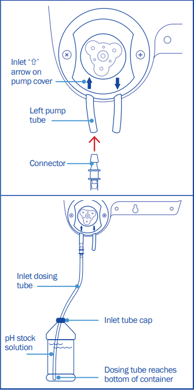
1. To straighten tube: Bend tube in the opposite direction and straighten by running through closed fingers.
2. Insert one end of the dosing tube with connector into the LEFT peristaltic pump tube. This is the ‘inlet dosing tube’.
3. Ensure the inlet dosing tube will reach the bottom of the pH stock solution container. There also needs to be enough tube left for the outlet dosing tube to go into the reservoir/tank.
Cut the inlet dosing tube to the desired length. Use inlet tube cap supplied to place on Bluelab Up or Down 500ml or 1L bottles. This will hold the tube in position. Insert the inlet dosing tube through the hole in the cap and pierce the induction seal on the bottle.
Set up outlet dosing tube
1. Insert the remaining dosing tube with connector into the RIGHT peristaltic pump tube. This is the ‘outlet dosing tube’.
2. Cut the outlet dosing tube so that the tube sits above the maximum solution level of the reservoir/tank. The pH stock solution must drip into the nutrient reservoir/tank. Note: If the outlet dosing tube is immersed in reservoir/tank solution, it could create a syphon. This would cause the pH stock solution to overflow.
SAFETY- Bluelab pH Up or Down Solutions are available in North America. They can be used undiluted with the pH Controller. Always follow the manufacturer's instructions and take care when handling.
Connect power adaptor
Select and connect the appropriate mains plug adaptor into 'PWR' socket. The default setting when the unit is first powered up is 'monitoring' mode. Switch on power adaptor at the mains. The unit will complete a display test sequence. Note: pH calibration must be completed before the first use.
Display menu and buttons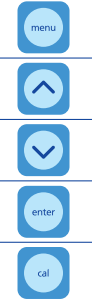
- One press of the ‘menu’ button will take you into the menu. To exit the menu, press ‘menu’ again. Changes will not be saved.
- The ‘∧’ (up arrow) button allows you to move up the menu items or increase a value shown.
- The ‘∨’ (down arrow) button allows you to move down the menu items or decrease a value shown.
- The ‘enter’ button allows you to select the desired option shown on the display, or save a chosen value.
- The ‘cal’ button is used to calibrate your pH probe. A long press enters the calibration sequence.
- The following symbols, numbers or characters will show on the display to indicate:
 7. To use the ‘Auto-repeat’ feature: Press and hold the ‘∧’ (up arrow) or ‘∨’ (down arrow) button to scroll through options. Release when you see the desired option or value on the screen.
Refer to the Bluelab pH Controller manual for the factory settings.
Change the display language
- Press ‘menu’. Press ‘∨’ to find language. Press ‘enter’ to select.
- Press ‘∨’ or ‘∧’ to find the required language.
- Press ‘enter’ to save the language selection. Press ‘menu’ to exit the menu.
pH calibration for the Bluelab pH Controller
Calibrating to two points
- If a reading below pH 7.0 is expected, use pH 7.0 and pH 4.0 calibration solutions.
- If a reading above pH 7.0 is expected, use pH 7.0 and pH 10.0 calibration solutions.
You would require calibration in THREE solutions if: Readings above and below pH 7.0 are expected, use pH 7.0, pH 4.0 then pH 10.0 calibration solutions. The calibration default is set to two point calibration. You will need to enable 3 point calibration in the settings menu.
If a three point calibration is required:
Press ‘menu’. Press ‘∨’ to find ‘2/3 point cal’. Press ‘enter’. Press ‘∨’ to select ‘3’. Press ‘enter’. When 'saved’ is displayed on screen, three point calibration is now available.
In separate plastic containers, prepare a small amount of: fresh tap water, pH 7.0, pH 4.0 and/or pH 10.0 calibration solutions.
4. pH 7.0 calibration
a) Ensure the pH controller is plugged in.
b) Press and hold ‘cal’ for three seconds. ‘pH 7 Calibrate’ will be displayed.
c) Place both clean pH and Temperature probe tips in the pH 7.0 calibration solution. Press ‘cal’.
d) Calibration is complete when all the ‘’s on the screen become solid. The screen will display ‘OK’ and the ‘pH 7’ indicator will appear to indicate successful pH 7.0 calibration.
e) Now you can calibrate to pH 4.0 and/or pH 10.0
5. pH 4.0 and/or pH 10.0 calibration
- a) Rinse both probe tips in fresh tap water, shake off excess water. Place the clean pH probe tip in either pH 4.0 or pH 10.0 calibration solution. Press ‘cal’.
- b) Calibration is complete when all the ‘’s on the screen become solid. The screen will display ‘OK’ and the ‘pH 4’ or ‘pH 10’ indicator will appear to indicate successful pH calibration.
- c) If you require three point calibration, repeat ‘5a’ and ‘5b’ using the pH 4.0 or pH 10.0, whichever solution was not used.
- d) The pH controller is now calibrated, and ready for use.
6. After pH calibration
the pH controller reverts to ‘Monitor’ mode. Change to ‘Control’ mode if required.
Placement of probes
1. Fit the (optional) pH probe holder to the stem of the pH probe using a gentle twisting motion.
2. Place the pH probe into the reservoir/tank and push the suction cup onto the side of the reservoir but far enough down so the pH probe tip is always in the solution. This prevents damage to the probe from any movement in the reservoir/tank.
3. Place the temperature probe alongside the pH probe.
Set the required pH
1. Press ‘menu’.
2. Press ‘∨’ to find ‘Set pH’. Press ‘enter’ to select.
3. Press ‘∨’ or ‘∧’ until the required pH is shown in the main display. Press ‘enter’ to save the value.
Note: If you have already set high and low alarm values, you may see the values change depending on the pH value being set.
Set the dosing direction - for pH up or down solution
1. Press ‘menu’.
2. Press ‘∨’ to find ‘Dose Up/Dn’. Press the enter button to select.
3. Press ‘∨’ or ‘∧’ to select the dosing direction that matches the pH stock solution being used in the system. Press ‘enter’ to save.
Note: Select ‘Dn/Acid’ for acid (pH down solution). Select ‘Up/Alkali’ for alkali (pH up solution).
Set the dosing OnTime and OffTime
A dosing cycle includes the OnTime and the OffTime that the peristaltic pump doses the system for. ‘OnTime’ is the length of time the peristaltic pump will dose for. The ‘OnTime’ can be set 1-60 seconds.
To set the OnTime value:
1. Press ‘menu’.
2. Press ‘∨’ to find ‘OnTime’. Press ‘enter’.
3. Press ‘∨’ or ‘∧’ to select the dosing on time in seconds. Press ‘enter’ to save.
‘OffTime’ is the delay time between each dose. This gives the system time to mix. The ‘OffTime’ can be set 1-60 minutes.
To set the OffTime value:
1. Press ‘∨’ to find ‘OffTime’. Press ‘enter’.
2. Press ‘∨’ or ‘∧’ to select the dosing off time in minutes. Press ‘enter’ to save.
Set alarms (optional)
The alarm function alerts you when the solution deviates too far from the desired pH. When an alarm condition is present, the pH value and the alarm symbol will flash on the screen. This is an ‘alarm lockout’ state. All dosing will stop. If the measurement changes back to within the limits you have chosen, the flashing will stop and dosing will start.
To set the ‘High Alarm’ value: Press ‘menu’. Press ‘∨’ to select ‘Alarm High’. Press ‘enter’. Press ‘∨’ or ‘∧’ to select the desired value. Press ‘enter’ to save.
To set the ‘Low Alarm’ value: Press ‘∨’ to select ‘Alarm Low’. Press ‘enter’. Press ‘∨’ or ‘∧’ to select the desired value. Press ‘enter’ to save.
To turn on the alarm: Press ‘∨’ to find ‘Alarm’. Press ‘enter’. Press ‘∨’ or ‘∧’ to select ’On’. Press ‘enter’ to save the value and turn on the alarm. Press ‘menu’ to exit back to the main display.
View current settings / status
Use this option to view your programmed settings at any time.
1. Press ‘∨’ or ‘∧’ while in ‘monitor’ or ‘control’ mode. The setting for each value is displayed at the bottom of the screen.
2. The display will revert to displaying ‘Required pH’ if no button is pressed after 1 minute.
Priming the pump / manual dosing
‘Pump Ovrde’ allows you to fill the inlet and outlet tubes with dosing solution before
first use (removing any air in the tubes), and to manually dose the tank if required.
Always ensure the inlet dosing tube reaches to the bottom of the pH stock solution
container. Ensure the outlet dosing tube is above the highest water line so that pH
stock solution drips into the tank/reservoir.
1. Press ‘menu’.
2. Press ‘∨’ to find ‘Pump Ovrde’. Press ‘enter’ to select.
3. Press ‘∨’ to manually operate the pump. Release the button to stop the pump when you see the stock solution begins to drip from the outlet dosing tube into the tank. Press ‘menu’ to exit.
If the outlet dosing tube was temporarily moved in step 1, place it back, so pH solution will drip into the tank/reservoir.
CHANGING STOCK SOLUTION: If you are changing from pH Up to pH Down, or vice versa, you
MUST flush the dosing tube with water FIRST to avoid a chemical reaction in the tube
Set the mode
Use ‘mode’ to select the pH controller function. ‘Monitor’ mode shows the current solution pH reading. It is the factory default setting. ‘Control’ mode allows the pH controller to dose pH stock solution to the set values. Dosing will NOT occur when:
• The pH controller is in ‘monitor’ mode
• The pH controller is in an alarm state
• If the pH controller senses dosing is not having an effect on the system (after 15 dose cycles)
• The solution temperature is above 50 °C / 122 °F, or below 0 °C / 32 °F
To set ‘monitor’ mode:
Press ‘menu’. Press ‘∨’ to select ‘Mode’. Press ‘enter’. Press ‘∨’ or ‘∧’ to select ‘monitor’, then press
‘enter’ to save the mode. Press ‘menu’ to exit.
To set ‘control’ mode:
Press ‘menu’. Press ‘∨’ to select ‘Mode’. Press ‘enter’. Press ‘∨’ or ‘∧’ to select ‘control’, then press ‘enter’ to save the mode. Press ‘menu’ to exit.
Change the screen backlight and/or contrast
These can be adjusted to best suit the light levels of the environment the pH controller is being used in. Backlight can be set at 0%, 25%, 50%, 75% or 100%. Contrast can be set between 0 and 30.
- To change the screen backlight:
Press ‘menu’. Press ‘∨’ to find ‘Backlight’. Press ‘enter’. Press ‘∨’ or ‘∧’ to select the desired value.
Press ‘enter’ to save, then ‘menu’ to exit back to the main display. - To change the screen contrast:
Press ‘menu’. Press ‘∨’ to find ‘Contrast’. Press ‘enter’. Press ‘∨’ or ‘∧’ to select the desired value.
Press ‘enter’ to save. Press ‘menu’ to exit.
Refer to the following articles on probe care for the pH Controller:
- Bluelab pH Probes: Care, maintenance and storage
- How to clean Bluelab pH Pen and Bluelab pH Probes [+ video]
Still can’t find what you're looking for? Contact Support