Configuring your IntelliDose with IntelliGrow
Next are the dawn and dusk time settings. These are only needed if you select “Irrigate during day only” or “different EC for day/ night”. The times entered here do not have to align with the actual day time and for indoor growing they will be set to reflect the period that the lights are on. After changing any settings, you must click the save button at the bottom to send them to the controller.
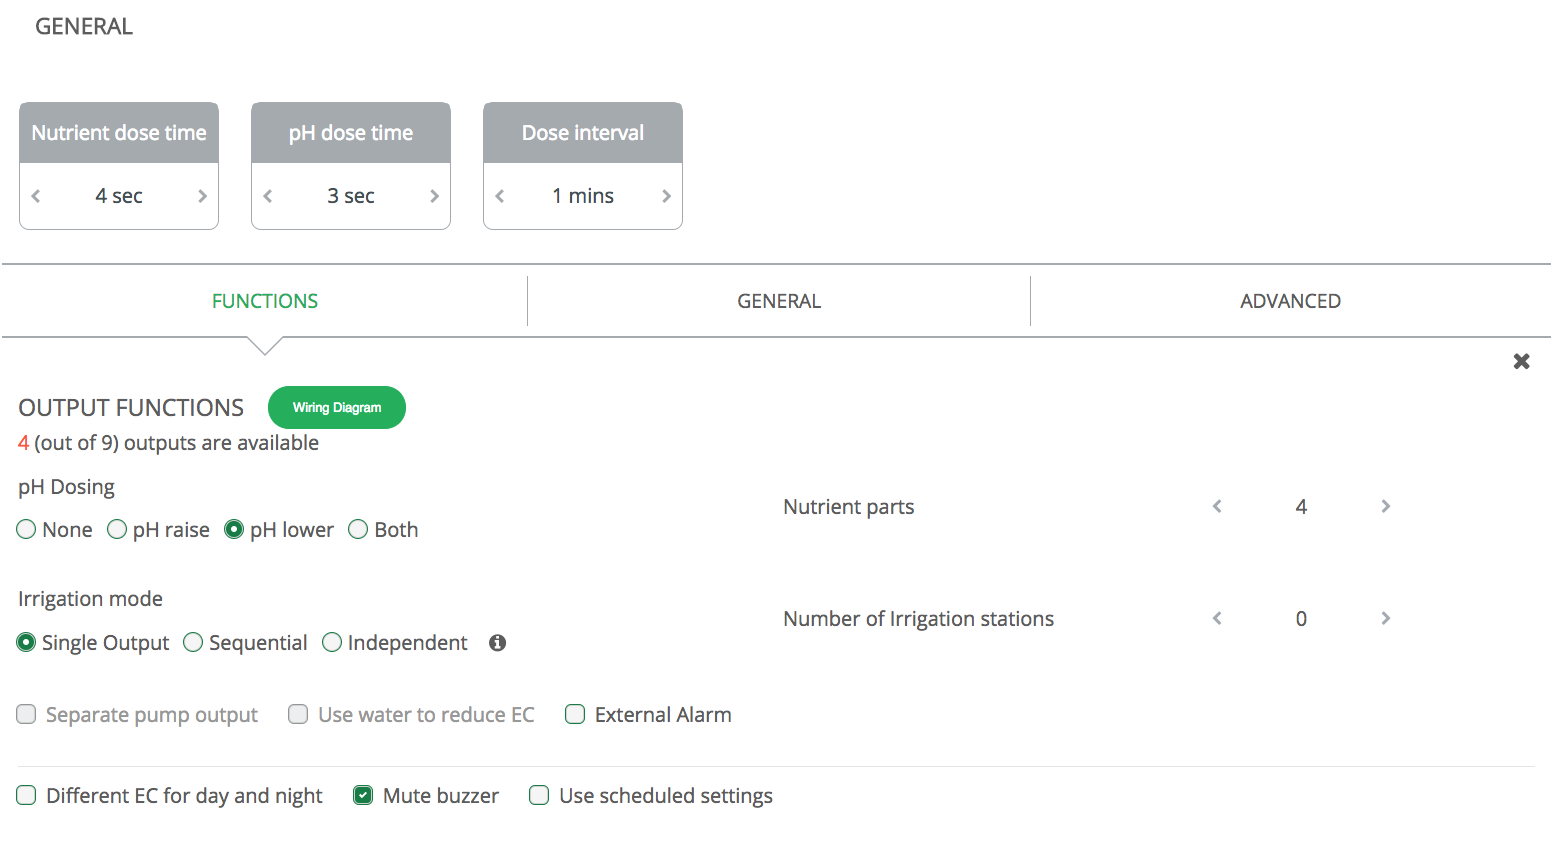
Next, select the number of nutrient parts that you wish to automatically dose. This needs some careful consideration. For example, there is no need to include an additive that is used only once in the initial tank of water.
Similarly, a flushing agent which is added to a fresh tank of water for the last day or two certainly does not need to be automatically dosed.
Remember also, that you have a total of 8 outputs (9 from version 3.03) and the more you use for nutrients, the less will be available for pH dosing and irrigation. Having selected the number of nutrients that are to be dosed continue by selecting the pH dosing required, then whether irrigation output is required.
If you wish to have a different EC (TDS) for day and night then this can also be selected and if selected you can also chose to add water automatically to reduce EC.
As soon as you have used all the 8 available outputs (9 from version 3.03) the options will appear greyed out and will be un-selectable. The only way to select them is to go back and deselect some previous choices.
Then you can select “scheduling” if desired. This gives you the opportunity to set up a complete growing schedule by specifying the nutrient ratios and EC for each stage of growth. This schedule or table is very easy to modify and so if the plant growth is slower or faster than expected you can easily make alterations at any time.
Note that it is possible to save the schedule to disk so that it can be used for future grows. We supply a standard schedule based on the recommendations as published by various manufacturers of three part nutrients.
This should be modified to suit the particular species of crop that you are growing and to suit your climatic conditions.

In the Advanced section, you can select proportional dosing if required. This will only work satisfactorily on systems that irrigate large quantities of water from the tank and therefore need very rapid dosing to get the EC and pH back to correct levels. If this is not the case then deselect this option.
Sequential dosing should always be selected unless there is a good reason not to. In fact, if you select more than 3 nutrient parts it will be enforced anyway. It should only be used with 1 or 2 part mixes and where you intend setting the dose interval to zero to achieve continuous dosing. This is sometimes used on very large irrigated systems so that continuous dosing occurs while irrigation takes place and fresh make-up water is entering on a continuous basis.
The fail-safe disables for dosing should always be enabled for safety. These prevent dosing if the controller suspects that a probe has become faulty or if the EC/pH are too far out.
The “Save current settings to disk” and “Restore settings from disk” do exactly that. They fetch all settings from the controller and store them in a file on your computer's hard drive. This allows you to quickly reset the controller to a previously saved setup that was known to work well for a particular season, for example.
For further information regarding the IntelliDose, check out the manual:
IntelliDose manual
%20copy-1.png?width=200&height=58&name=Bluelab-logo__Trans_RGB-medium%20(2)%20copy-1.png)