
Before you get started, make sure you have created an IntelliGrow account.
Once you have that up and running, there are 2 ways to connect to your IntelliLink device:
- Physical connection to your local network via Ethernet/LAN cable (We recommend using this option)
- Wireless connection using any Smart device (Laptop/Tablet/Mobile)
IMPORTANT NOTES BEFORE STARTING THE CONFIGURATION:
- There are three versions of intelliLink please check if your IntelliLink is broadcasting it's wifi (2.4Ghz) as:
intelliLink
intellilink-qcil[serial number]
intellilink-agil[serial number] - Should you wish to connect more than one IntelliLink to the same network, please power and configure them one at a time to avoid any problems in finding the relevant IntelliLink on the network.
- It is recommended that you connect your Intelli device(s) to the IntelliLink via USB before starting the configuration process. Should you want to connect the devices at a later stage, you are still free to do so. It will not affect the operation of the IntelliLink.
1. Physical connection to your local network via Ethernet/LAN cable
When using Ethernet/LAN, following are the steps:
- Power-on IntelliLink device
- Plug-in Ethernet/LAN cable
- If using Windows PC (Windows-7, 8.1 or 10), run the il-finder.exe tool. An internet browser tab will be opened for each IntelliLink device connected to the network. The il-finder.exe application can be downloaded from below links or from the Autogrow website.
Download il-finder 32-bit - If using Linux, MAC or Windows PC (alternative options), open up any browser (Chrome, Safari, Firefox, Internet Explorer) and enter one of the following URLs:
intellilink.local:3333
intellilink-qcil[serial number].local:3333
intellilink-agil[serial number].local:3333
Examples:
intellilink-qcil1234567.local:3333
intellilink-agil1234567.local:3333
Note: Check the physical serial number on the IntelliLink for QCIL or AGIL
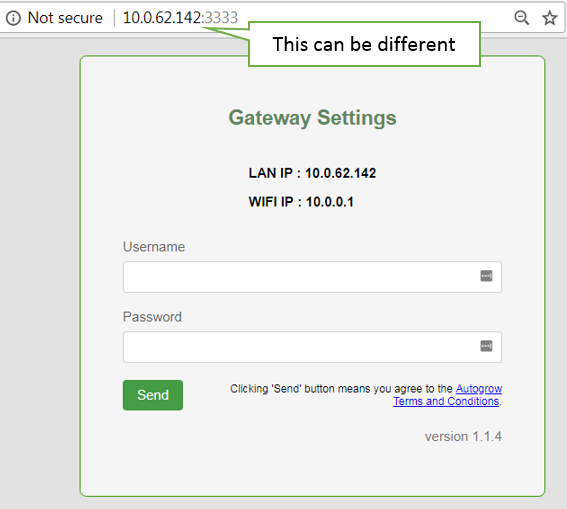
If the il-finder tool on Windows or URL in Linux/MAC works fine, then, the IntelliLink configuration page will be displayed as shown below:

- On IntelliLink configuration page, change the following settings in order as mention below:
NOTE: We highly recommend documenting any changes you make on the gateway settings page. For example, IP address and changed intellilink device name are very important to document. Bookmark IntelliLink configuration Gateway Page after setting it up.
- Update the original IntelliLink name from “intellilink” to something more descriptive, i.e. “greenhouse1”
(note intellilink-qcil[serial number] may be displayed, feel free to change) - Gateway Settings (Your online IntelliGrow account username and password)
NOTE: Do not configure Wifi (SSID) settings if using Ethernet/LAN - Update Time Zone Settings. By default it is set to UTC time zone.
After configuring IntelliLink device, please allow up to 5 minutes for the IntelliLink to establish the new connection. If you have any Intelli device connected to IntelliLink, it should show up in your online Intelligrow account. If the device(s) does not show up, please check our FAQ for IntelliLink or contact Autogrow support team
2. Wireless (2.4Ghz) connection using any Smart device (Laptop/Tablet/Mobile)
When using WiFi (2.4Ghz), following are the steps:
- Power-on IntelliLink device
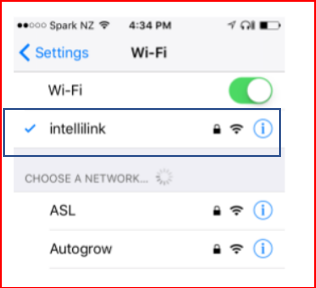
- Navigate to the WiFi Settings on your device. Search for the “intellilink” or intellilink-qcil[serial number] (e.g intellilink-qcil123456789) hotspot SSID.
- Connect to the hotspot using the password “intellilink” or "qcil[serial number]"
- Open a browser on your Smart device and navigate to the address:
10.0.0.1:3333
If the hotspot connection works fine, then, the IntelliLink configuration page will be displayed as shown below:
- On IntelliLink configuration page, change the following settings in order as mention below:
NOTE: We highly recommend documenting any changes you make on the gateway settings page. For example, IP address and changed IntelliLink device name are very important to document. Bookmark IntelliLink configuration Gateway Page after setting it up.
- Update the original IntelliLink name from “intellilink” to something more descriptive, i.e. “greenhouse1”
(note intellilink-qcil[serial number] may be displayed, feel free to change)
IMPORTANT NOTE:
- After updating the device name, hotspot will disconnect.
- If you are using more than one IntelliLink device on the same network, it is highly recommended that this field be updated to a unique name. That way you can easily differentiate to which one you are connecting when you need to perform any additional configuration. - Reconnect to the updated IntelliLink hotspot name i.e. changed IntelliLink name. Password is the same 'intellilink'. Please allow up to 5 minutes for updated IntelliLink name to show up. If it still doesn't show up within this time frame, please disconnect the power to the IntelliLink for 30 seconds and reconnect again.
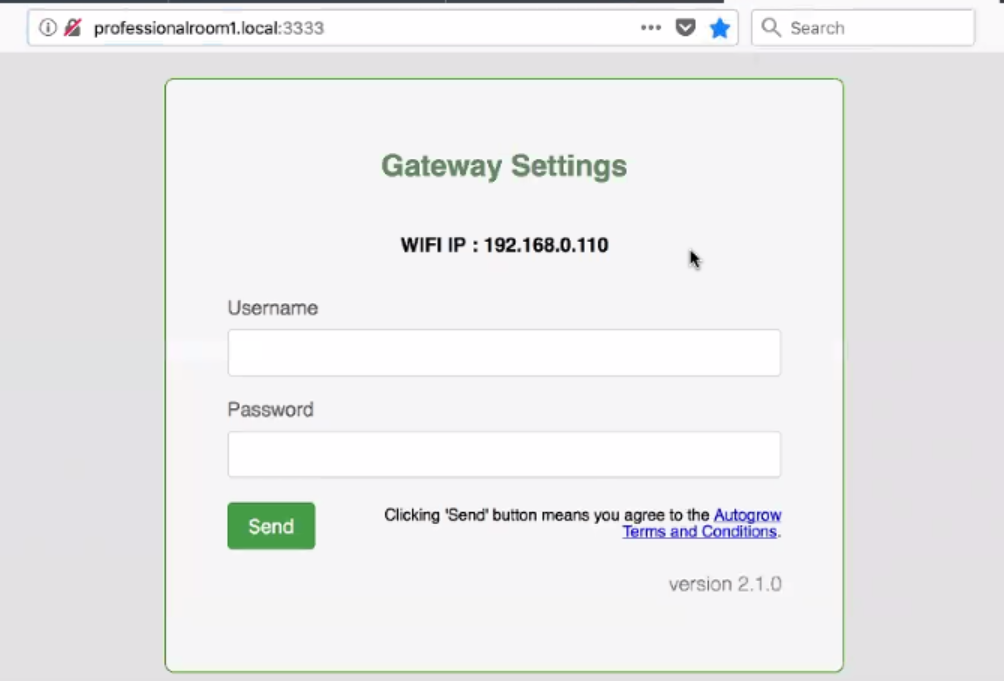
- Open up the browser again and access IntelliLink Configuration page.
new-IntelliLinkDeviceName.local:3333 OR 10.0.0.1:3333
Replace "new-IntelliLinkDeviceName" with the updated device name. - Configure Wifi (2.4Ghz) (SSID) settings.
Note: SSID name & password cannot contain any special characters (!@#$).
After configuring WiFi settings, you will be disconnected from hotspot as the IntelliLink device has new configuration ( new IP address) and you would need to reconnect.
IMPORTANT NOTE: The IntelliLink has no mechanism to verify that the WIFI SSID and Passwords have been entered correctly. Should there still not be any connection, reconfigure the WiFi details to ensure that no incorrect entry of WiFi details has occurred
The IntelliLink can only connect to a Wifi network that is on 2.4Ghz, (5Ghz is not supported). - Reopen IntelliLink Configuration Page after configuring WiFi Settings:
- On Windows device (PC/Laptop), run the il-finder.exe tool (check section for "Physical connection to your local network via Ethernet/LAN cable") . You can find it under LAN/Ethernet section on the same page.
- On Linux/MAC/iOS, open up any browser (Chrome, Safari, Firefox, Internet Explorer) and enter the following URL: new-IntelliLinkDeviceName.local:3333
- On Android device, use the following address: new-IntelliLinkDeviceName:3333 or new-IntelliLinkDeviceName.local:3333 - If everything is successful so far, the IntelliLink configuration page should open-up and now configure Gateway Settings (Your online Intelligrow account username and password)
- Update Time Zone Settings. By default it is set to UTC time zone.
NOTE: You must set correct time zone settings on IntelliLink Configuration Page otherwise you may notice your controller is running ahead/behind of your current timezone - Please allow up to 5 minutes for the IntelliLink to establish the new connection. If you have any Intelli device connected to IntelliLink, it should show up in your online Intelligrow account. If the device(s) does not show up, please check our FAQ for IntelliLink or contact Autogrow support team

Still unable to configure your IntelliLink? Please book an appointment with our expert to help you by contacting support.