Getting Started: Using your Bluelab Pulse™ with Edenic
Learn how to get the most of your Bluelab Pulse™ and the Edenic by Bluelab app.
To get started you will need to have the Edenic app downloaded to your mobile device, logged in and already paired your Bluelab Pulse™ to the app. For a guide on how to do this click here.
This guide will guide you through viewing measurements on your mobile device, saving a measurement to Edenic, syncing measurements from the Pulse™ and making settings changes to the Pulse™ via Edenic.
To save or sync measurements both your mobile device and Pulse™ need to be within 10 meters of each other.
Taking a Measurements
On the Device Index select your Bluelab Pulse™. You can easily find your Pulse™ card by selecting the Pulse™ filter at the top of the screen.

Once selected, Edenic will connect to the Pulse™ via Bluetooth.

If your Pulse™ does not connect automatically, make sure it is turned on and press the refresh button in the disconnected message in the app.

Saving a Measurement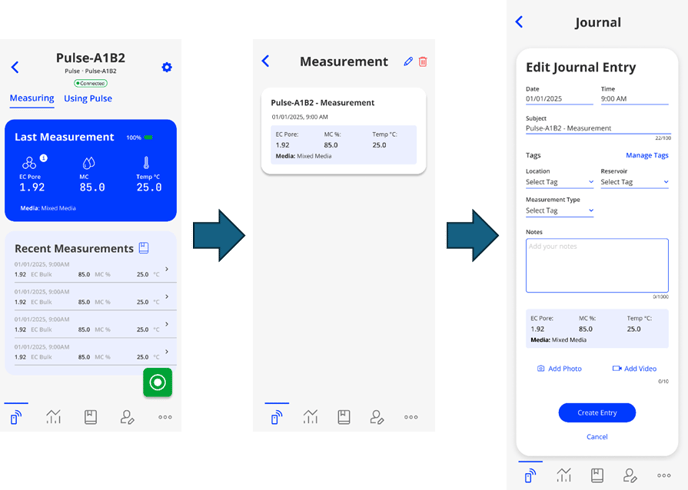
To save a measurement in Edenic follow these steps below:
- Turn your Pulse™ on.
- In Edenic select the Pulse™ device card in the Device Index.
- Confirm your Pulse is configured to the substrate you are measuring in.
- Place your Pulse™ in the substrate you wish to measure.
- Either press the button on Pulse or select the green “O” button in Edenic to take a measurement.
- The Measure will be displayed in the Measurement card.
- To add details to the measurement, select it in the Recent Measurements List. Enter any details you wish to save with the measurement, e.g relevant tags, notes and/or images/videos. Then select Save. To learn more about Tags click here.
- Your measurement has now been saved to your Journal in Edenic.
Syncing Measurements

To sync measurements saved to your Pulse™ follow these steps below:
- Turn your Pulse™ on and login to Edenic.
- In Edenic select the Pulse™ device card in the Device Index
- If there are measurements available to sync a message bubble will be displayed.
- Select the sync icon to enter syncing mode, here you can choose to:
- Sync all measurements. Any additional details will be applied to all synced measurements for this session.
- Review before syncing. Allows for custom details to be added or deletion of unwanted measurements.
- Delete all measurements from the Pulse™.
- Once synced, measurements are available to view in the Journal.
Note: Once a measurement has been synced to Edenic it is no longer available from the Pulse™.
Note: Syncing measurements takes time, especially if there is a lot of them.
Viewing Saved Measurements

To view your measurements in Edenic follow these steps below:
- In the Edenic app navigate to Journal. Here you will find all your saved measurements and any journal entries you have created.
- To view more details about a measurement, just select it.
- A selected measurement can also be edited or deleted.
- You can also filter your Journal Entries and Measurements by using the Filter option.
Changing Settings

Edenic can be used to change the following settings on the Bluelab Pulse™:
- Device Name
- Substrate
- EC Range Min and Max
- MC Range Min and Max
- Manage Calibrations
For any changes to be made the Pulse needs to be turned on and within 10 meters of your mobile device.
To make a settings change follow these steps:
- In Edenic select the Pulse™ device card in the Device Index
- Select the Cog icon.
- Make desired change.
- Submit Changes
Note: A guide on calibrating your Pulse™ can be found here